ADC management
This section covers the ADCs managed through the Portal - which vendors and software versions are supported and the functionality available for each, preparing and adding an ADC, and viewing and managing those already added, including one-click access to each ADC’s WebUI and the actions available from the ADC actions menu.
Multi Vendor Support
ADCs from multiple vendors can be added to the ADC Portal. The table below lists which ADCs are currently supported.
| Vendor | Software Versions Supported | Notes |
|---|---|---|
Loadbalancer.org |
Enterprise v8.13.8 & later |
Can also be used as a Shuttle - see Loadbalancer Enterprise |
Loadbalancer.org |
Endurance v3.2.1 & later |
Cannot yet be used as a Shuttle - see Loadbalancer Endurance |
F5 |
BIG-IP v17.0.0.1 & later |
Previous versions may be supported but have not been verified |
Kemp |
LoadMaster v7.2.55.0.21071 & later |
Previous versions may be supported but have not been verified |
Citrix |
Netscaler v13.1-48.47 & later |
Previous versions may be supported but have not been verified |
Generic Appliance |
n/a |
Any network device can be added for basic monitoring - no API credentials are required |
A10 |
Thunder |
Support for A10 ADCs is coming soon |
Edgenexus |
ADC |
Support for Edgenexus ADCs is coming soon |
The functionality available for each ADC type varies as shown below:
| ADC Type | Warp | Backup | Update | Security Insights |
|---|---|---|---|---|
Loadbalancer Enterprise |
Yes |
Yes |
Yes |
Yes |
Loadbalancer Endurance |
Yes |
Yes |
Yes |
Yes |
F5 BIG-IP |
Yes |
Yes |
No |
Yes |
Kemp LoadMaster |
Yes |
Yes |
No |
Yes |
Citrix ADC |
Yes |
Yes |
No |
Yes |
Generic Appliance |
No |
No |
No |
No |
Adding an ADC to the Portal
| There must already be an accessible Shuttle available before an ADC can be added. To adopt a Shuttle, see Shuttle Management. |
Step 1 - Prepare the ADC
Loadbalancer.org Enterprise Appliances:
An Enterprise appliance is prepared in one of two ways, depending on whether it will also act as a Shuttle:
-
The appliance will also be used as a Shuttle - adopt it as described in Loadbalancer Enterprise. Adoption is where the Adoption Method, Adoption Token, Portal Email and Portal Password fields on the Portal Management page are used.
-
The appliance will only be managed/monitored in the ADC Portal - enable Gateway-only mode as described below. This starts the Gateway service and stops the Shuttle service. None of the adoption fields are involved.
To enable Gateway-only mode:
-
Using the appliance’s WebUI, navigate to Local Configuration > Portal Management.
-
Click the Enable Gateway-only mode button. The Adopt Appliance fields above it are only used for adoption and do not need to be completed.
-
The Enable Gateway-only mode confirmation dialog is displayed. This explains that the Gateway service will be started so that remote Shuttles can manage the appliance through it, and that the appliance will not run a Shuttle itself. Click Enable.
-
A Commit changes panel is displayed at the top of the page. Click Restart Gateway to start the service.
The Gateway service is not running until Restart Gateway has been clicked. Until then the appliance cannot be added to the Portal - the attempt fails with Authentication failed: error calling Login. -
The Status field changes to Gateway-only mode - this appliance is managed by remote Shuttles.
| The Status field at the top of the Portal Management page shows the appliance’s current connection state, e.g. Disconnected (no services running). |
All other ADC Appliances:
-
Follow the manufacturers instructions to add a user account that has permissions to make API calls.
-
Note the user credentials as these will be needed when adding the appliance in the ADC Portal in the next step.
| The Generic Appliance type is the exception - it doesn’t use API calls, so no user account or credentials are needed. When adding a Generic Appliance, the API configuration details step is not presented and only the Namespace, Label, Address and Port must be specified. A Generic Appliance is listed and monitored for reachability only - Warp, backups, software updates and security insights are not available. |
Step 2 - Add the ADC to the Portal
-
Click LOADBALANCER | PORTAL in the Portal’s main menu bar to view the Dashboard.
-
In the ADCs panel:
-
If there are currently no ADCs, click Connect an ADC.
-
In the menu to the left, select List.
-
-
if ADCs have already been added, click View my ADCs.
-
-
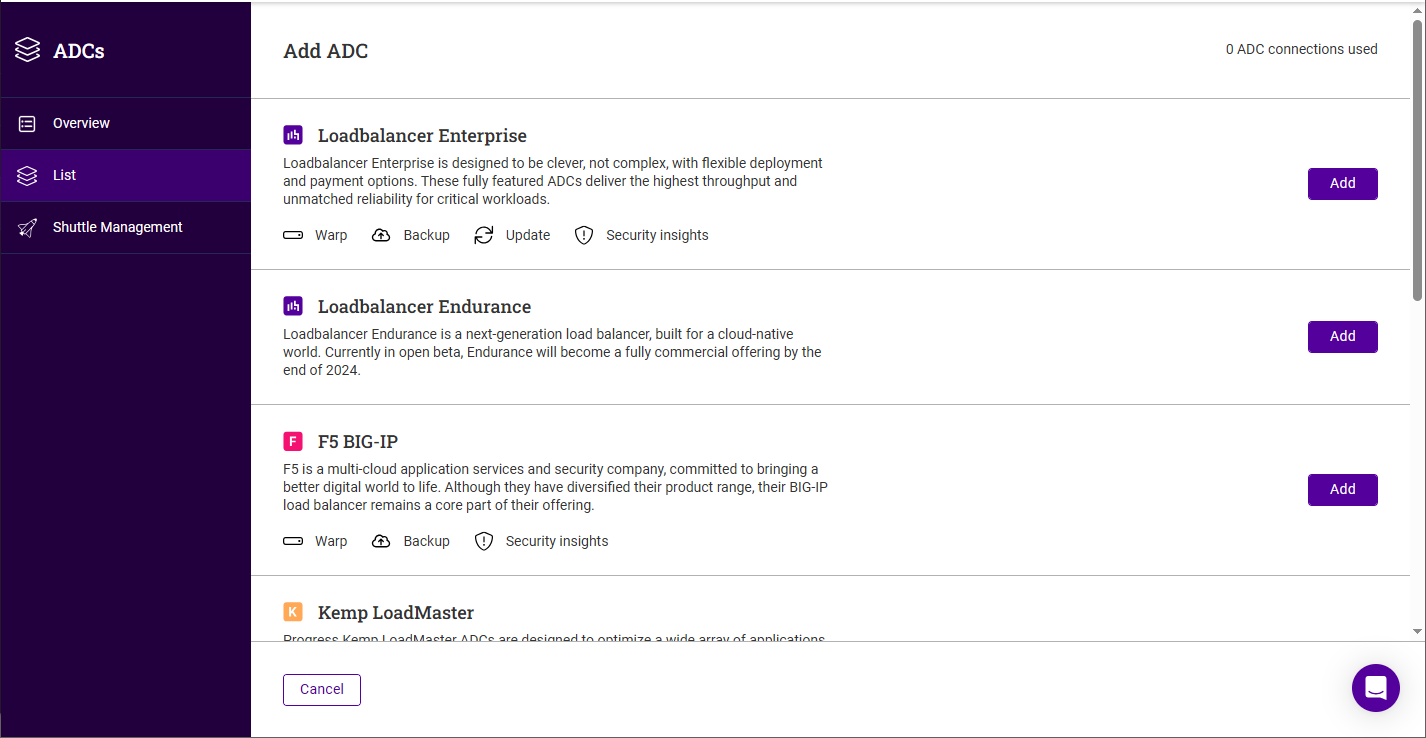
Click the Add ADC button.
-
Click the Add button for the type of ADC to be added, for example Loadbalancer Enterprise.
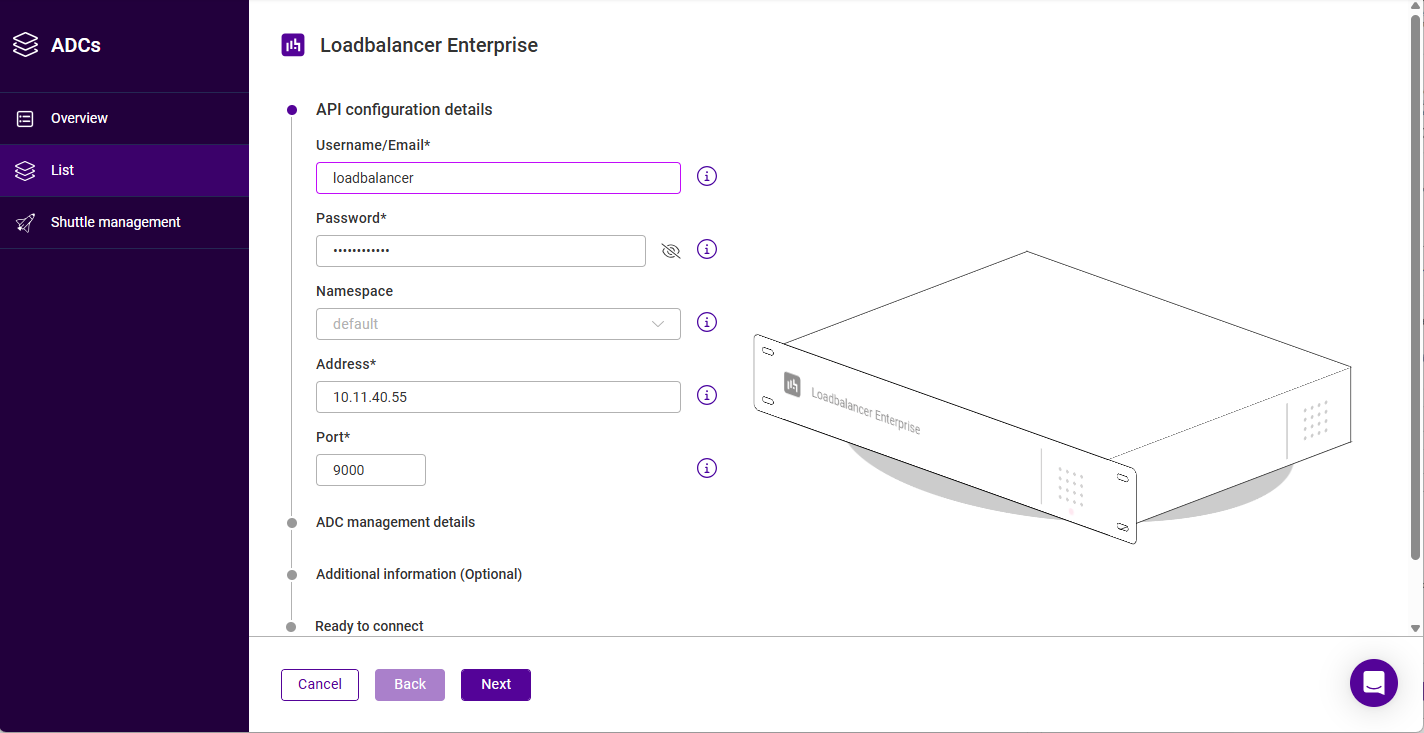
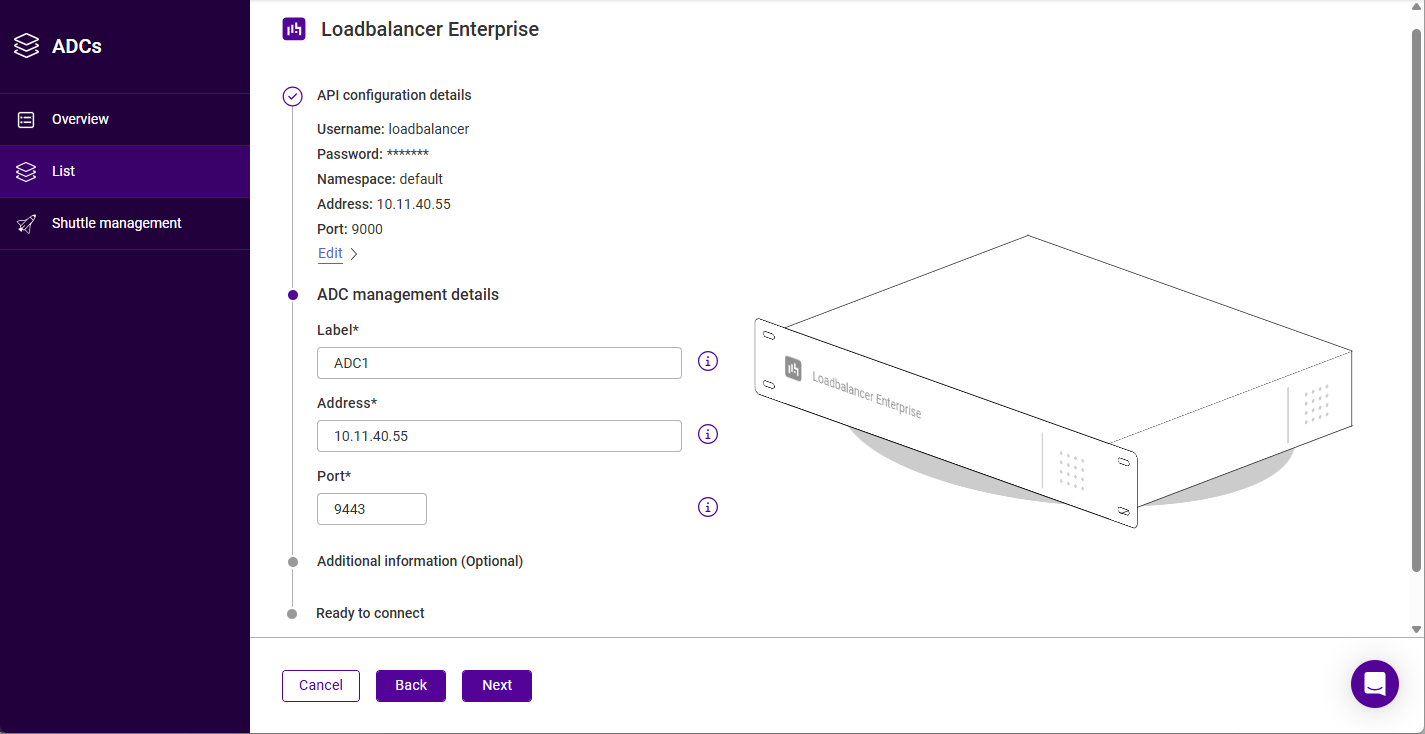
The form is presented as a series of steps, listed down the left of the form with the current step highlighted. For a Loadbalancer Enterprise appliance these are API configuration details, ADC management details, Additional information (Optional) and Ready to connect. Each completed step collapses to a summary with an Edit link, so earlier entries can be changed before the appliance is submitted. -
Specify the Username/Email and enter the associated Password. For the Loadbalancer Enterprise, the "loadbalancer" user/password can be used.
-
Select the required Namespace.
-
Enter the IP Address of the appliance being added.
-
Leave the Port set to the default value unless this has been changed for the appliance being added.
-
Click Next.
-
Enter an appropriate Label (name) for the appliance.
-
Ensure that the IP Address is correct.
-
Leave the Port set to the default value unless this has been changed from the default value.
-
Click Next.
-
Enter any required Notes and Tags to describe the appliance and click Next.
Both fields are optional. To create a tag, enter the required name and hit Enter. The tag will appear colored blue under the Tags field - click the x on a tag to remove it. Repeat to specify multiple tags (up to 30). -
Verify all settings, these can be changed if needed using the relevant Edit option.
-
Click Submit - if the details have been specified correctly, the appliance will appear in the list.
If the Portal cannot reach or authenticate to the appliance, an error message is displayed - for example Authentication failed: error calling Login - and the form returns to the first step with the details preserved so that they can be corrected. Check that the appliance has been prepared as described in Step 1 and that the Address, Port and credentials are correct.
Viewing & Managing ADCs
To view all ADCs:
-
Click LOADBALANCER | PORTAL in the main menu bar to view the Dashboard.
-
A summary of the ADCs already added to the Portal will be displayed in the ADCs panel.
-
Click View my ADCs to see details of all ADCs.
-
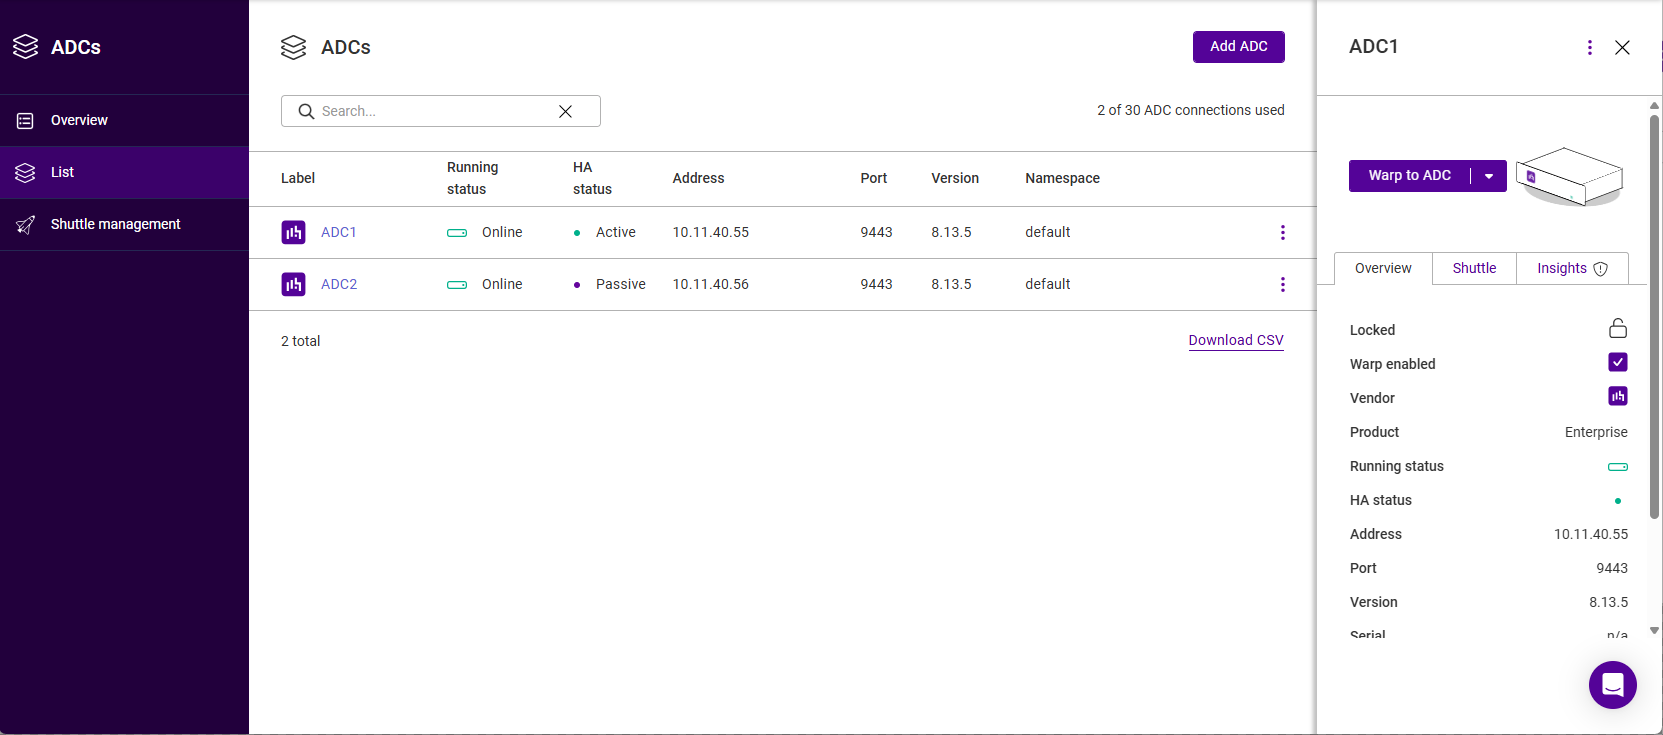
All existing ADCs will be listed. The following details are shown for each: Label, Running status, HA status, Address, Port, Version and Namespace. The number of ADC connections used and the number available under the current subscription is shown above the list, e.g. 1 of 30 ADC connections used.
HA status shows the appliance’s role in its HA pair, i.e. Active or Passive. An appliance that has not been configured for HA shows Unavailable. To view/manage a particular ADC:
-
Click LOADBALANCER | PORTAL in the main menu bar to view the Dashboard.
-
In the ADCs panel, click View my ADCs.
-
Click the Label (name) of the ADC to be managed, a new information panel will be displayed to the right.
-
The Overview tab provides a summary of the ADC - Locked, Warp enabled, Vendor, Product, Running status, HA status, Address, Port, Version, Serial, Date added (shown in both local time and UTC), Notes and Tags.
-
The Shuttle tab lists the Shuttles that are available for the ADC to use.
-
The Insights tab details any security issues (CVEs) found.
-
Connect to an ADC’s WebUI
The Portal enables instant, one-click access to any ADC’s WebUI - for ADCs located in connected networks direct access can be used, for ADCs located in other networks WARP (not available with the Free Portal subscription level) can be used.
ADC Actions Menu
-
Click the three dots menu for the ADC, the actions menu will be displayed.
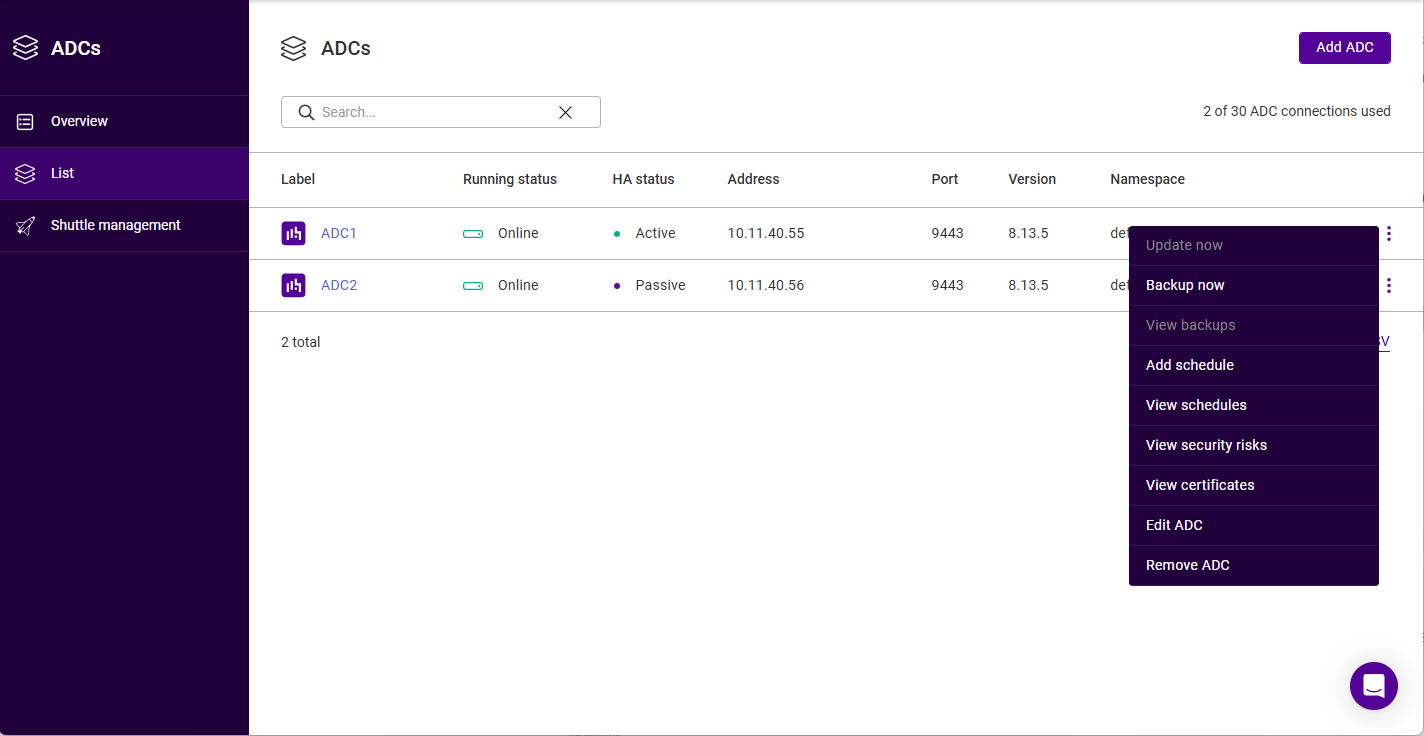
-
Select the required action:
-
Update now
-
If an update is available, select to update the appliance to the latest version.
-
-
Backup now
-
A backup of the ADC will be created.
-
-
View backups
-
If backup have been created, all backups for this ADC will be listed.
-
To order by a particular column, click the column heading. The sort order (ascending or descending) is indicated by the arrow. Click the column heading again to change the sort order.
-
To download a backup:
Depending on permissions granted, access to the OrgPrivateKey may be required when downloading backups. For more information on accessing the OrgPrivateKey, see Encryption & Keys. -
Click the three dots menu to the right and click Download.
-
Enter your password and click Submit.
-
-
To delete a backup:
-
Click the three dots menu to the right and click Delete, then click Confirm to proceed.
-
-
-
Add schedule
-
The Create Schedule screen will be displayed.
-
The Product type is set to ADC and Schedule type can be set to Backup or Update.
-
Specify the required Date, Time and for backups the Occurrence, click Next, select the ADC(s) and click Save schedule.
-
-
View schedules
-
The Schedules screen will be displayed. Any schedules created for the ADC will be listed.
-
-
View security risks
-
The Security Insights screen will be displayed. Any CVEs for the ADC will be listed.
-
-
View certificates
-
The Certificate Details screen will be displayed. All certificates on the ADC will be listed.
-
-
Edit ADC
-
The Edit ADC Details screen will be displayed. Update the settings as required and click Submit to save. For more information, see Editing an ADC.
-
-
Remove ADC
-
Remove the ADC from the Portal. You’ll be prompted to confirm that you want to proceed, click Confirm to remove the ADC.
-
-
| Options that are not applicable are greyed out. For example, View backups is unavailable until at least one backup has been taken, and Update now is unavailable when the ADC is already running the latest version or its vendor doesn’t support updates from the Portal. |
Editing an ADC
The Edit ADC Details screen provides the following settings:
| Field | Purpose |
|---|---|
Lock ADC |
When enabled, the ADC cannot be edited or removed. This is reflected by the Locked field on the ADC’s Overview tab. |
ADC name |
The Label (name) used for the ADC in the Portal. |
Warp enabled |
Enables WARP access to the ADC’s WebUI. |
Username/Email |
The user account the Portal uses to make API calls to the ADC. |
Password |
The password for the account above. Leave blank to keep the existing password. |
API configuration details |
The Address and Port used for API/Gateway communication with the ADC (default port 9000 for a Loadbalancer Enterprise appliance). |
ADC management details |
The Address and Port used to reach the ADC’s WebUI (default port 9443 for a Loadbalancer Enterprise appliance). |
Namespace |
The Namespace the ADC belongs to. |
Notes |
Free-text notes describing the ADC. |
Tags |
Tags used to organize and search for the ADC. Enter the required name and hit Enter to create each tag (up to 30). |
Click Submit to save any changes.