Shuttle management
This section covers the Shuttle - the sidecar agent that creates the communication channel between the Portal and the ADCs on your network. It covers adopting a Shuttle, either on a Loadbalancer.org Enterprise appliance or as a standalone Linux instance, defining subnets so that a Shuttle can reach ADCs in remote networks, and viewing and managing the Shuttles already adopted.
As mentioned in Technology, a Shuttle is required to enable ADCs to communicate with the ADC Portal. A Shuttle is a sidecar agent that creates a communication channel between the Portal and the ADCs available on your network.
A Shuttle can be provisioned as a Loadbalancer.org appliance or as a standalone Linux instance running the shuttle service. Using a standalone Linux Shuttle enables all ADC Portal communication to be handled by a dedicated Shuttle separate from all load balancing workload.
As explained in High Availability Shuttles, multiple Shuttles can be deployed within each namespace to provide HA and resilience. ADCs can use any accessible Shuttle to communicate with the ADC Portal.
At least one Shuttle must be adopted by the ADC Portal before any ADCs can be added.
Adopting a Shuttle
Loadbalancer Enterprise
A loadbalancer.org Enterprise appliance running its shuttle service can be used as a Shuttle.
| The appliance to be used as a Shuttle should be v8.13.8 or later. |
When adding a Shuttle, the Connection method dropdown in the Portal offers the following options:
| Option | Purpose |
|---|---|
Credentials |
Adoption is initiated from the appliance using the Portal account’s email address and password. No token is generated in the Portal. |
Token (for WebUI) |
The Portal generates a token which is pasted into the Adoption Token field on the appliance’s Local Configuration > Portal Management page. |
Token (for CLI) |
The Portal generates a complete |
Using Portal Credentials
Step 1 - Initiate the Shuttle Adoption Process
-
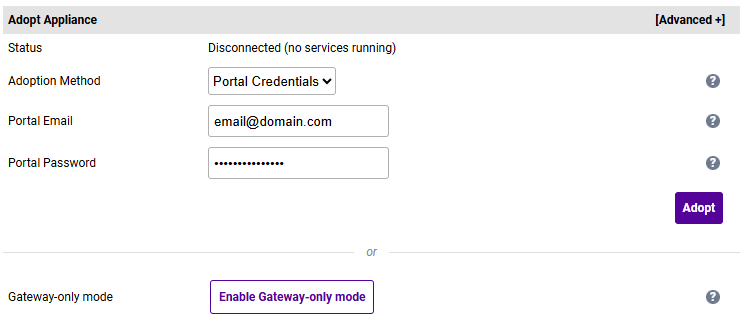
Using the Enterprise appliance’s WebUI, navigate to Local Configuration > Portal Management.
-
Set the Adoption Method to Portal Credentials.
-
Enter the Portal Email and Portal Password for the Portal account.
-
Click Adopt. An Adopt this appliance confirmation dialog is displayed - click Start adoption to continue, or Cancel to return to the form.
-
The appliance confirms Adoption request sent and the Status changes to Adoption pending - awaiting Portal approval. As the accompanying message explains, a Portal admin now needs to approve this appliance to complete the process.
Step 2 - Complete the Shuttle Adoption Process
-
Click LOADBALANCER | PORTAL in the Portal’s main menu bar to view the Dashboard.
-
In the ADCs panel:
-
If there are currently no ADCs, click Connect an ADC.
-
Using the menu to the left, select Shuttle management.
-
-
If ADCs have already been added, click View my ADCs.
-
Using the menu to the left, select Shuttle management.
-
-
-
Click the Adopt button for the Shuttle being added.
Multiple Shuttles may be displayed if others have been configured but not yet adopted. -
Once adopted, the Shuttle name and other attributes can be changed if required. For more information, see Shuttle Actions Menu.
| To continue and add an ADC to the Portal, see ADC Management. |
Using a Token (for WebUI)
Step 1 - Initiate the Shuttle Adoption Process
-
Click LOADBALANCER | PORTAL in the Portal’s main menu bar to view the Dashboard.
-
In the ADCs panel:
-
If there are currently no ADCs, click Connect an ADC.
-
Using the menu to the left, select Shuttle management.
-
-
If ADCs have already been added, click View my ADCs.
-
Using the menu to the left, select Shuttle management.
-
-
-
Click the Add shuttle button.
-
Click the Add button for the Loadbalancer Enterprise.
-
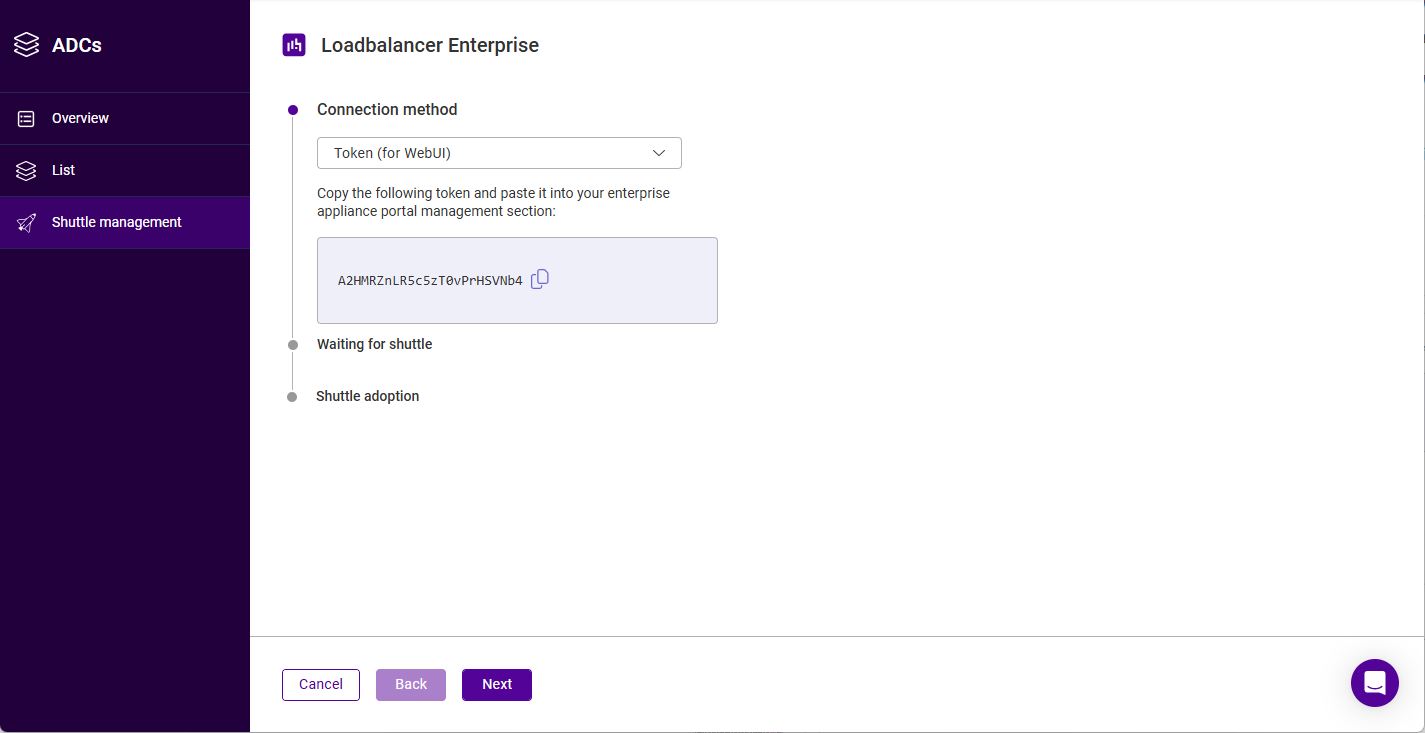
Set the Connection method to Token (for WebUI).
-
Copy the token using the copy icon - this will be used in the next step.
-
Click Next.
-
The Loadbalancer Enterprise form will now show the Waiting for shuttle step. This displays the message Please visit the portal management page on your appliance and complete the adoption form and a Waiting for adoption… indicator - the Portal waits here until the appliance completes its side of the process.
Step 2 - Enter the Adoption Token in the Appliance
-
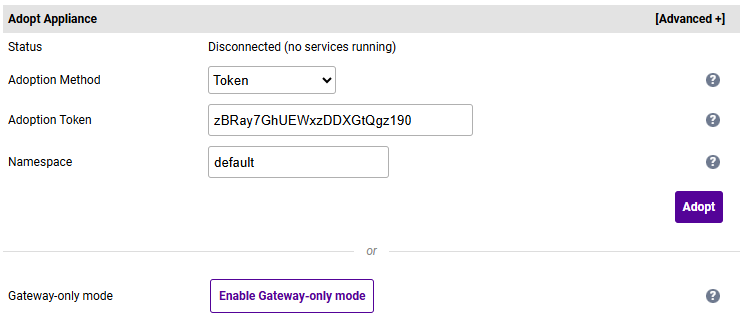
Using the Enterprise appliance’s WebUI, navigate to Local Configuration > Portal Management.
-
Set the Adoption Method to Token.
-
Paste the token copied in the previous step into the Adoption Token field.
-
If required, change the Namespace.
-
Click Adopt. An Adopt this appliance confirmation dialog is displayed - click Start adoption to continue, or Cancel to return to the form.
-
The appliance confirms Adoption request sent and the Status changes to Adoption pending - awaiting Portal approval. As the accompanying message explains, a Portal admin now needs to approve this appliance to complete the process.
Step 3 - Complete the Shuttle Adoption Process
-
Return to the ADC Portal. The form advances by itself from Waiting for shuttle to the Shuttle adoption step, which displays the message Please select the shuttle to adopt and lists each Shuttle that has contacted the Portal but has not yet been adopted, showing its Name, Address and Port.
Multiple Shuttles may be displayed if others have been configured but not yet adopted. If the expected Shuttle is not listed, use the Contact Us link below the list. -
Click the Adopt button for the Shuttle being added. The entry briefly shows an Adopting indicator, then the form closes and the new Shuttle is listed on the Shuttle Management page. On the appliance, the Status changes to Adopted by the Portal and a Reset / Disconnect button is displayed.
-
Once adopted, the Shuttle name and other attributes can be changed if required. For more information, see Shuttle Actions Menu.
| To continue and add an ADC to the Portal, see ADC Management. |
Using a Token (for CLI)
Step 1 - Initiate the Shuttle Adoption Process
-
Click LOADBALANCER | PORTAL in the Portal’s main menu bar to view the Dashboard.
-
In the ADCs panel:
-
If there are currently no ADCs, click Connect an ADC.
-
Using the menu to the left, select Shuttle management.
-
-
If ADCs have already been added, click View my ADCs.
-
Using the menu to the left, select Shuttle management.
-
-
-
Click the Add shuttle button.
-
Click the Add button for the Loadbalancer Enterprise.
-
Set the Connection method to Token (for CLI).
-
Copy the command displayed using the copy icon. It takes the following form, where the namespace shown is the one currently selected in the Portal:
lbsidecar --adopt=<token> --namespace=default
-
Click Next.
-
The Loadbalancer Enterprise form will now show the Waiting for shuttle step. This displays the message Please visit the portal management page on your appliance and complete the adoption form and a Waiting for adoption… indicator - the Portal waits here until the appliance completes its side of the process.
Step 2 - Run the Command on the Appliance
-
Run the copied command on the Enterprise appliance at the console or via an SSH session.
Step 3 - Complete the Shuttle Adoption Process
-
Return to the ADC Portal. The form advances by itself from Waiting for shuttle to the Shuttle adoption step, which displays the message Please select the shuttle to adopt and lists each Shuttle that has contacted the Portal but has not yet been adopted, showing its Name, Address and Port.
Multiple Shuttles may be displayed if others have been configured but not yet adopted. If the expected Shuttle is not listed, use the Contact Us link below the list. -
Click the Adopt button for the Shuttle being added. The entry briefly shows an Adopting indicator, then the form closes and the new Shuttle is listed on the Shuttle Management page. On the appliance, the Status changes to Adopted by the Portal and a Reset / Disconnect button is displayed.
-
Once adopted, the Shuttle name and other attributes can be changed if required. For more information, see Shuttle Actions Menu.
| To continue and add an ADC to the Portal, see ADC Management. |
Standalone Shuttle
A standalone Shuttle is a dedicated Linux instance that runs the Shuttle service. The instance requires sudo, curl and gpg to be installed to allow the required installation files to be downloaded and installed.
Step 1 - Initiate the Shuttle Adoption Process
-
Click LOADBALANCER | PORTAL in the Portal’s main menu bar to view the dashboard.
-
In the ADCs panel:
-
If there are currently no ADCs, click Connect an ADC.
-
Using the menu to the left, select Shuttle management.
-
-
If ADCs have already been added, click View my ADCs.
-
Using the menu to the left, select Shuttle management.
-
-
-
Click the Add shuttle button.
-
Click the Add button for the Standalone Shuttle.
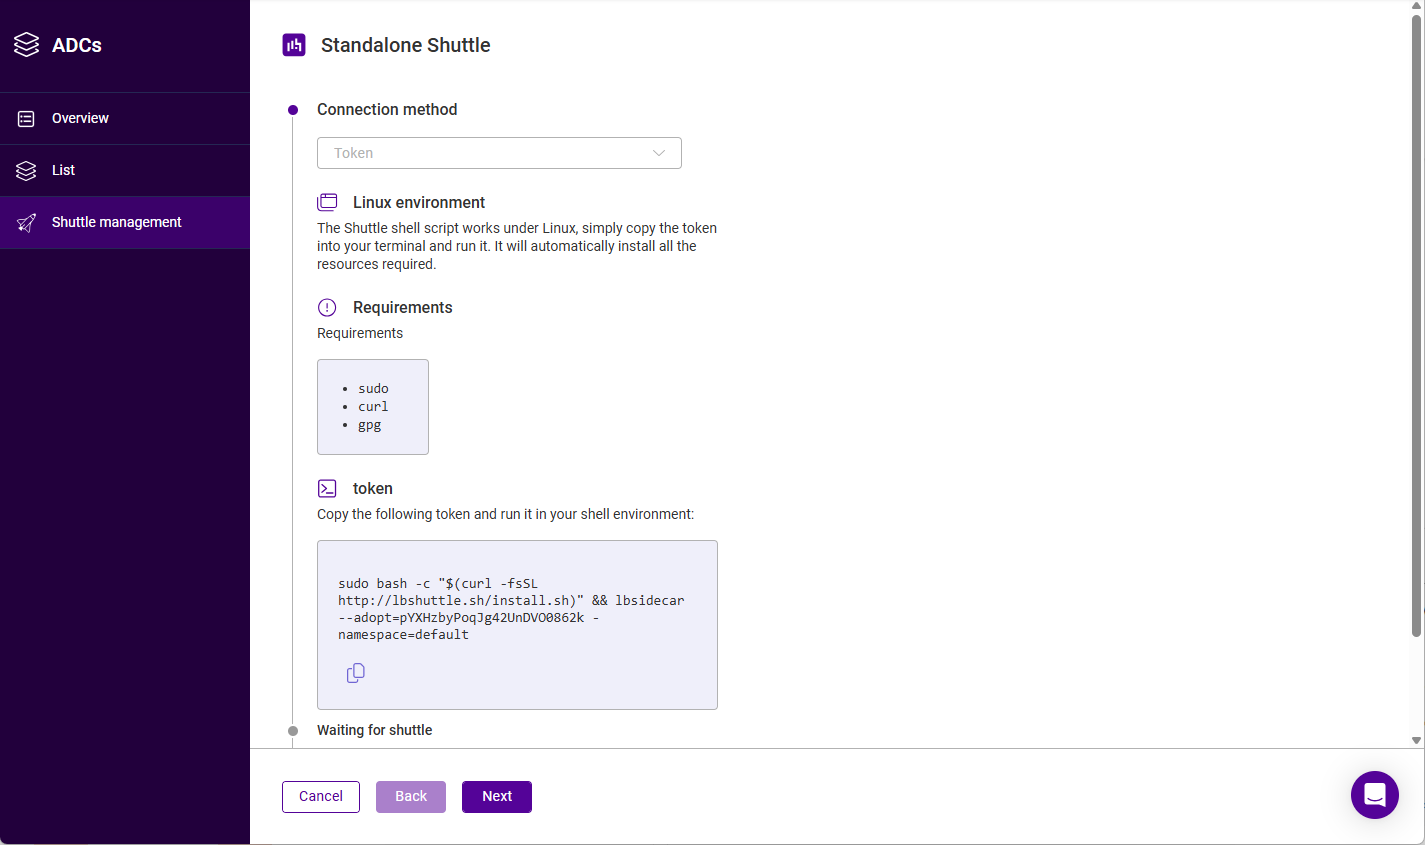
The Connection method is fixed at Token (for CLI) for a standalone Shuttle and cannot be changed. -
Copy the installation command as directed using the copy icon provided. It takes the following form, where the namespace shown is the one currently selected in the Portal:
sudo bash -c "$(curl -fsSL http://lbshuttle.sh/install.sh)" && lbsidecar --adopt=<token> --namespace=default
-
Click Next. The Standalone Shuttle form will now show the Waiting for shuttle step, and waits there until the Shuttle has been installed and has contacted the Portal.
Step 2 - Prepare the Linux Instance & Install the Shuttle
-
Deploy a new Linux instance that will be used as the standalone Shuttle.
-
Ensure that sudo, curl and gpg are installed - these are also listed under Requirements on the Standalone Shuttle form.
-
Run the copied command on the Linux instance at the console or via an SSH session.
-
When the command completes successfully, the following message will be displayed:
> Installation complete

Successfully initiated adoption process. Please visit the Portal to complete the adoption process.
Step 3 - Complete the Shuttle Adoption Process
-
Return to the ADC Portal. The form advances by itself from Waiting for shuttle to the Shuttle adoption step, which displays the message Please select the shuttle to adopt and lists each Shuttle that has contacted the Portal but has not yet been adopted, showing its Name, Address and Port.
Multiple Shuttles may be displayed if others have been configured but not yet adopted. If the expected Shuttle is not listed, use the Contact Us link below the list. -
Click the Adopt button for the Shuttle being added. The entry briefly shows an Adopting indicator, then the form closes and the new Shuttle is listed on the Shuttle Management page.
-
Once adopted, the Shuttle name and other attributes can be changed if required. For more information, see Shuttle Actions Menu.
| To continue and add an ADC to the Portal, see ADC Management. |
Network Topology
If the Shuttle does not have network access to all ADCs, a subnet for each remote ADC must be defined. This configures a static route on the Shuttle to enable access to the remote subnet.
| You’ll also need to ensure that routing for the remote subnet(s) allows traffic to return to the Shuttle. |
To add a new subnet:
-
Click LOADBALANCER | PORTAL in the Portal’s main menu bar to view the Dashboard.
-
In the ADCs panel:
-
If there are currently no ADCs, click Connect an ADC.
-
Using the menu to the left, select Shuttle management.
-
-
If ADCs have already been added, click View my ADCs.
-
Using the menu to the left, select Shuttle management.
-
-
-
Click the three dots menu to the right of the relevant standalone Shuttle and select Edit shuttle.
-
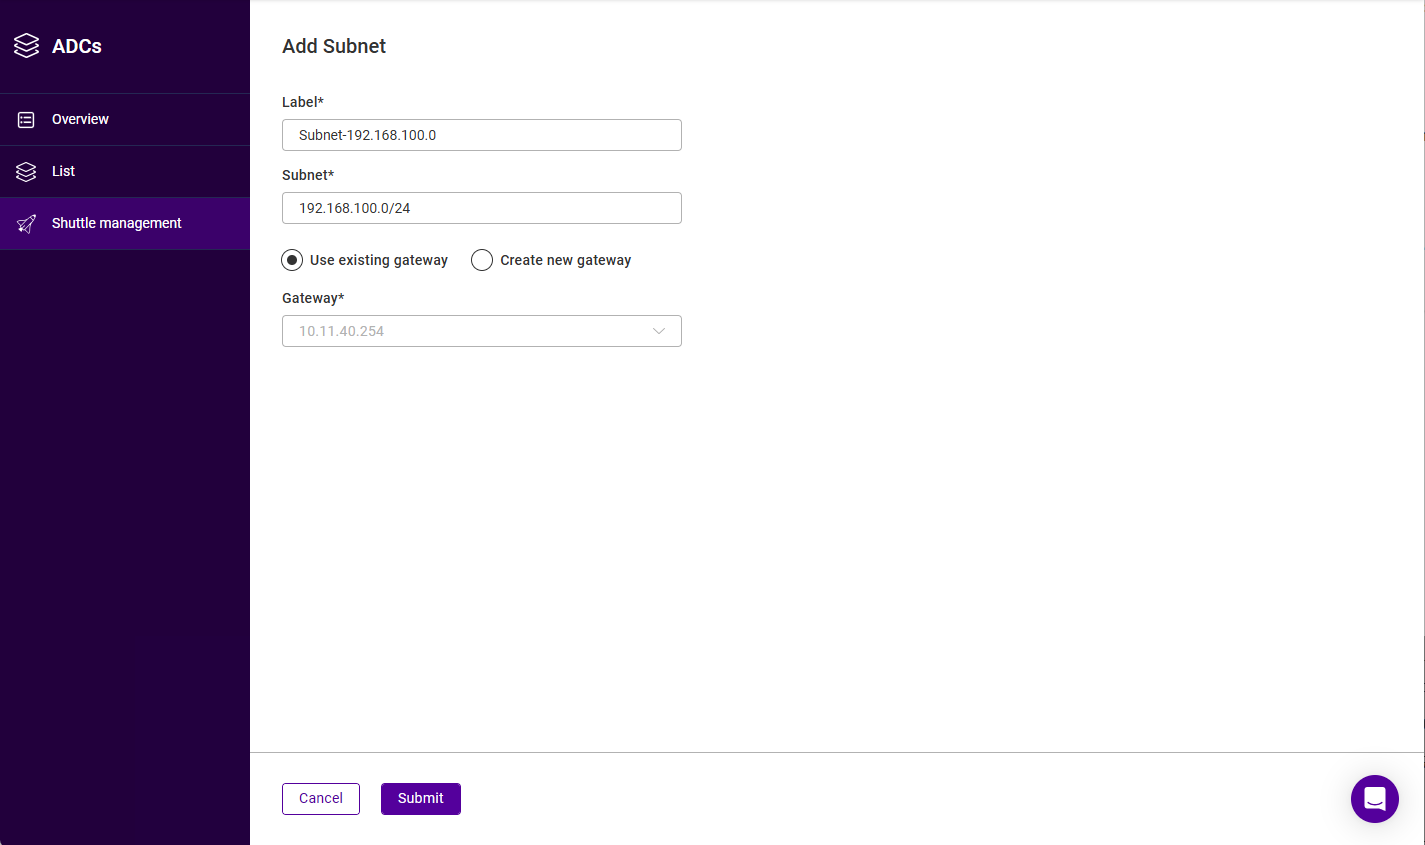
Select the Subnets tab then click the Add subnet button.
-
Specify a suitable label (name) for the subnet, e.g. Subnet-192.168.100.0.
-
Enter the subnet address, e.g. 192.168.100.0/24.
-
Leave Use existing gateway selected to pick an existing gateway from the Gateway dropdown. To use a different gateway, select Create new gateway - the Gateway field then becomes a text field so that the new gateway’s IP address can be entered.
-
Click Submit.
-
Once created, a graphical representation of the subnet and associated gateway will be displayed:
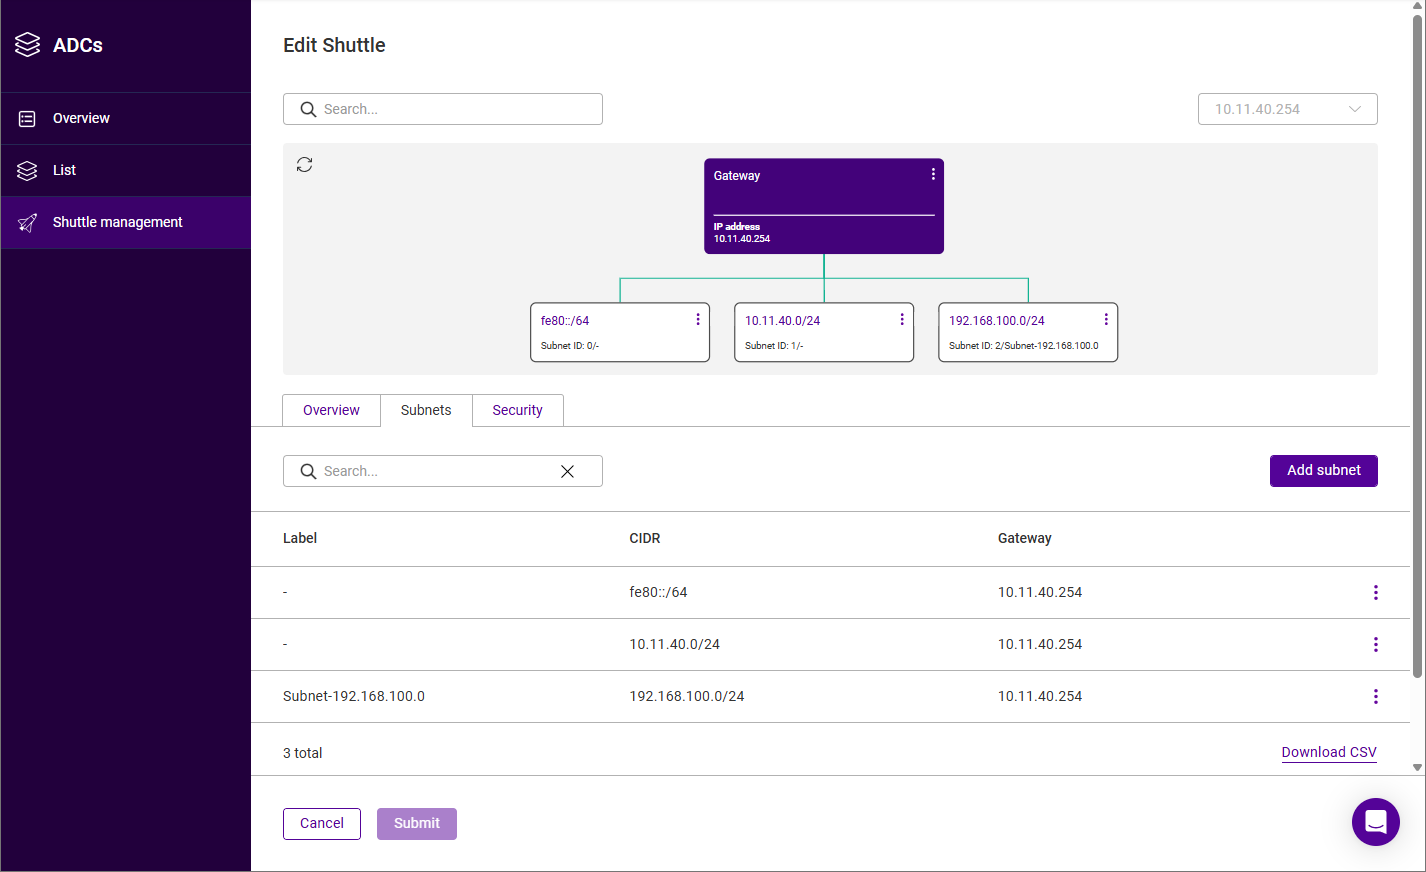
Repeat these steps to add additional subnets if required.
To delete a subnet:
-
Click the three dots menu next to the subnet to be deleted.
-
Click Delete, then click Confirm to delete the subnet.
Viewing & Managing Shuttles
To view all Shuttles:
-
Click LOADBALANCER | PORTAL in the main menu bar to view the Dashboard.
-
In the ADCs panel, click View my ADCs.
-
Using the menu to the left, select Shuttle management.
-
All existing Shuttles will be listed. The following details are shown for each: Shuttle name, Running status, IP address, Associated ADCs, Namespace and Version.
To view/manage a particular Shuttle:
-
Click LOADBALANCER | PORTAL in the main menu bar to view the Dashboard.
-
In the ADCs panel, click View my ADCs.
-
Using the menu to the left, select Shuttle management.
-
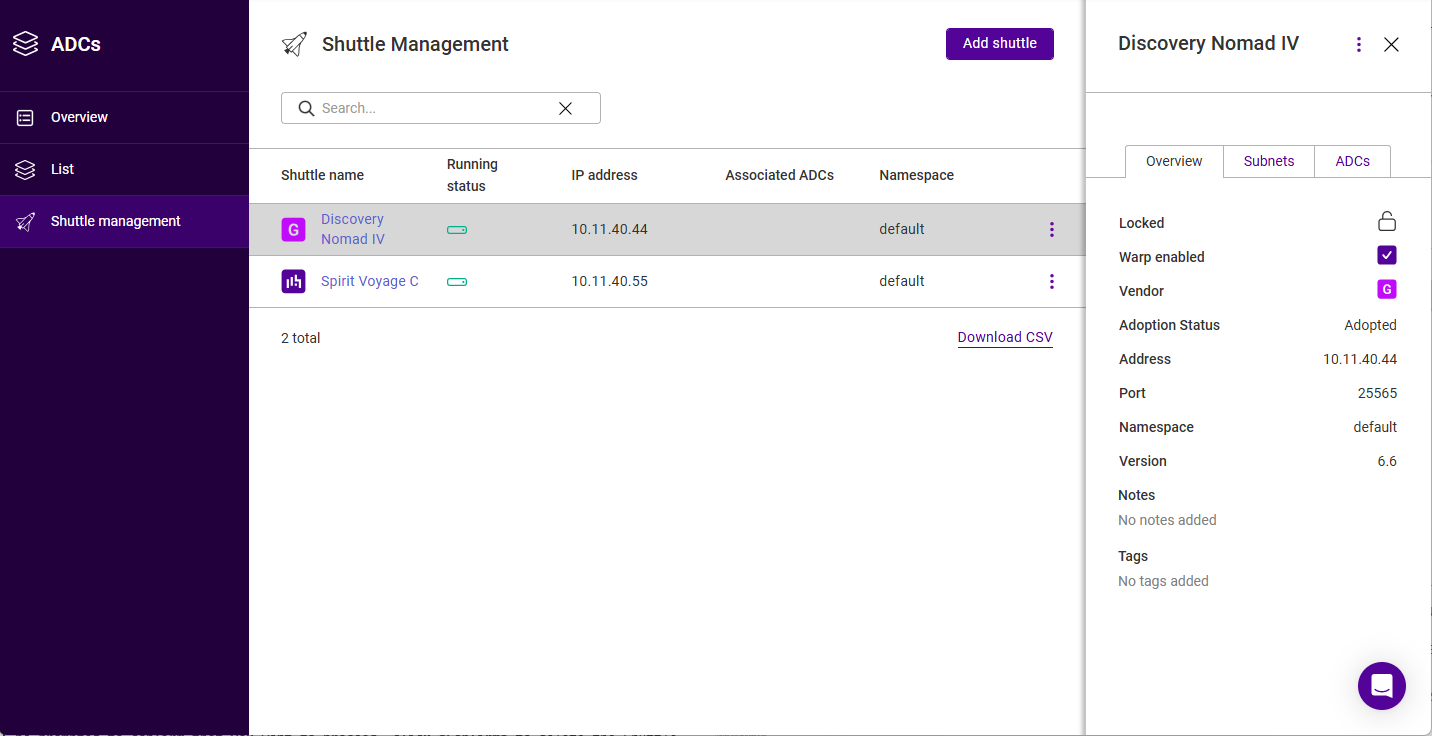
Click the Shuttle name of the Shuttle to be viewed, a new information panel will be displayed to the right.
-
The Overview tab provides a summary of the Shuttle - Locked, Warp enabled, Vendor, Adoption Status, Address, Port, Namespace, Version, Notes and Tags.
-
The Subnets tab lists the subnets that the Shuttle is associated with, showing the CIDR and Gateway for each.
For more information on subnets, see Network Topology. -
The ADCs tab lists the ADCs that are associated with the Shuttle.
-
Shuttle Actions Menu
-
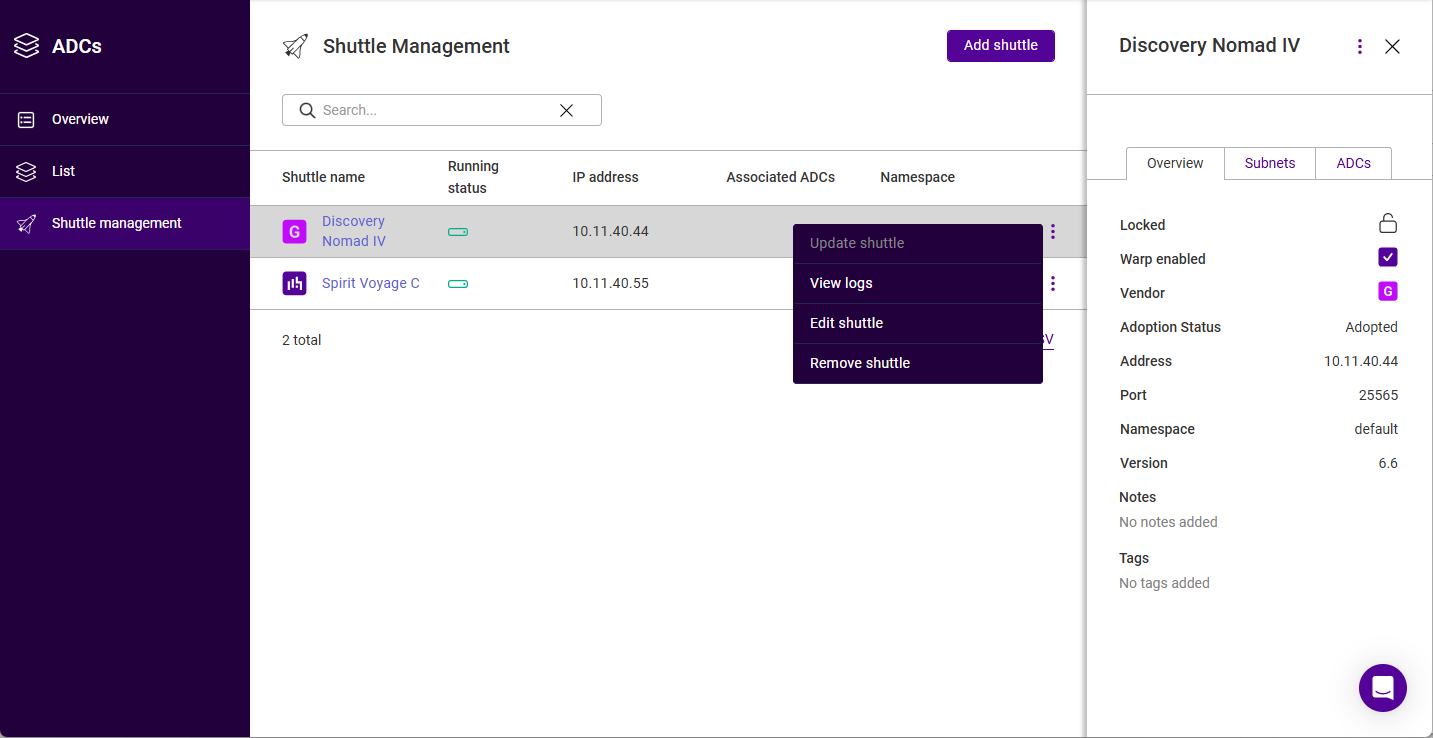
Click the three dots menu for the Shuttle, the actions menu will be displayed.
-
Select the required action:
-
Update shuttle
-
Update the Shuttle service to the latest version.
This option will be greyed out if there are no updates available.
-
-
View logs
-
View the Shuttle logs.
-
-
Edit shuttle
-
The Edit Shuttle screen will be displayed. Update the settings as required and click Submit to save. For more information, see Editing a Shuttle.
-
-
Remove shuttle
-
Remove the Shuttle from the Portal. You’ll be prompted to confirm that you want to proceed, click Confirm to delete the Shuttle.
This option will be greyed out if any ADCs are using the Shuttle to communicate with the ADC Portal.
-
-
Editing a Shuttle
The Edit Shuttle screen displays a graphical representation of the Shuttle and the subnets it serves, together with the following tabs:
-
Overview - the Shuttle name, Namespace, Notes and Tags, together with the Shuttle’s Version and IP.
Version and IP are read-only. The Namespace dropdown is greyed out when the organisation has only one Namespace - it becomes selectable once a second Namespace has been added. -
Subnets - lists the subnets defined for the Shuttle (Label, CIDR and Gateway) and provides the Add subnet button.
Add subnet is only available for standalone Shuttles. It’s greyed out when the Shuttle is a Loadbalancer.org appliance running its Shuttle service. -
Security - two checkboxes:
-
Lock your Shuttle from changes or removal. - when enabled, the Shuttle cannot be edited or removed. This is reflected by the Locked field on the Shuttle’s Overview tab.
-
Warp enabled - enables WARP access via this Shuttle.
-
Click Submit to save any changes.