SSL
SSL Certificates
SSL certificates are managed centrally under Cluster Configuration > SSL Certificates. Certificates added here can then be associated with Layer 7 services to provide SSL/TLS termination, as described in SSL/TLS Termination - Concepts.
The page is divided into four tabs:
-
Certs - server certificates (the certificate and its matching private key).
-
CSR - Certificate Signing Requests.
-
CA - Certificate Authority (signing/root) certificates.
-
CRL - Certificate Revocation Lists.
Adding Certificates
If you already have an SSL certificate in either PEM or PFX/P12 format, it can be added to the load balancer either by uploading the file, or by copying & pasting the certificate text.
To add a new certificate:
-
Using the WebUI, navigate to Cluster Configuration > SSL Certificates.
-
Select the Certs tab.
-
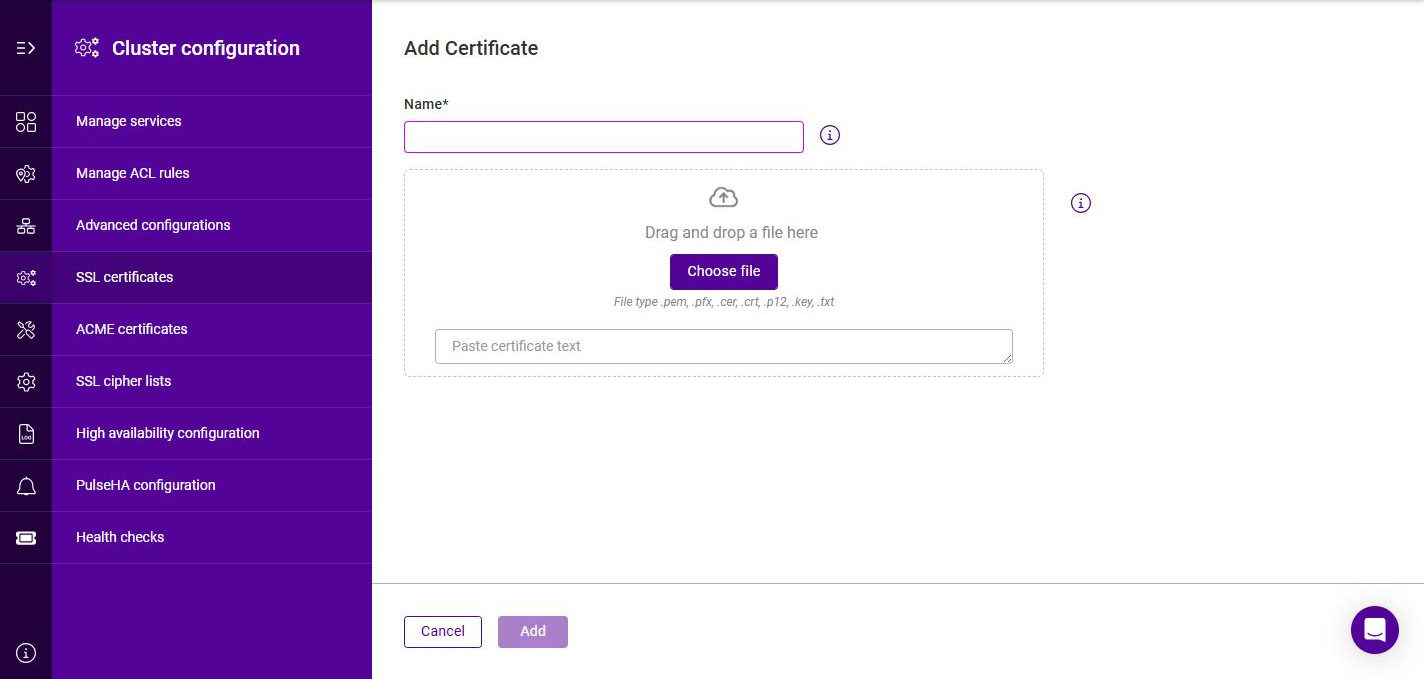
Click Add certificate.
-
Specify an appropriate Name for the certificate.
-
Provide the certificate content using one of the following methods:
-
Upload a file - drag & drop the file onto the upload area, or click Choose file and browse to and select the relevant file. Supported file types are .pem, .pfx, .cer, .crt, .p12, .key and .txt.
-
Paste - paste the certificate content into the Paste certificate text box. This should include the PEM-encoded certificate, its matching private key and any chain (intermediate) certificates - or the contents of a PFX/P12 keystore.
Include all text from
-----BEGIN CERTIFICATE-----through to-----END CERTIFICATE-----, followed by the matching private key from-----BEGIN PRIVATE KEY-----through to-----END PRIVATE KEY-----, as shown in the example below:-----BEGIN CERTIFICATE----- MIIDQDCCAigCAQEwDQYJKoZIhvcNAQELBQAwYzELMAkGA1UEBhMCQVUxEzARBgNV BAgMClNvbWUtU3RhdGUxDzANBgNVBAcMBlBvbXBleTEPMA0GA1UECgwGbGIub3Jn MQwwCgYDVQQLDANkZXYxDzANBgNVBAMMBmxiLm9yZzAgFw0yMzAyMjIwOTA0Mjla GA8zMDIyMDYyNTA5MDQyOVowZzELMAkGA1UEBhMCQVUxEzARBgNVBAgMClNvbWUt -----END CERTIFICATE----- -----BEGIN PRIVATE KEY----- MIIEvwIBADANBgkqhkiG9w0BAQEFAASCBKkwggSlAgEAAoIBAQC8caJCiYt8T8zb y3bipXhi8xNXx4iZ2UJvULeSsos/4TWpQelkeslcU/iHUlYXSgCa+zQLGnxXOC/h KaELYEA7aX8FaoHnE1peVh/flEADOgeXUvcMNr19THeuhvQfjzcsYMSuohtMqsyd GC6nrt7WbXdjTVV3k0esh5IAza5Dzuarxbr62PIshX9Vzxt9ap9ADfH2w76YuzIX 3ztO19Bs5V7xUe4ZMvABdvGETbyDSE4p48hjHkCgiRH87U8G+mI9oiiHe+4nT5ML 8j7kQTKk1HNQiT3zhT9C8Jmti4DcWOBAMGEC+sm56IA3TQaroRUAnUm+oNvnEdcv -----END PRIVATE KEY-----
-
-
Click Add.
Certificate Signing Request (CSR)
Certificates can also be created by generating a Certificate Signing Request (CSR) and sending this to your chosen Certificate Authority (CA).
To create a CSR:
-
Using the WebUI, navigate to Cluster Configuration > SSL Certificates.
-
Select the CSR tab.
-
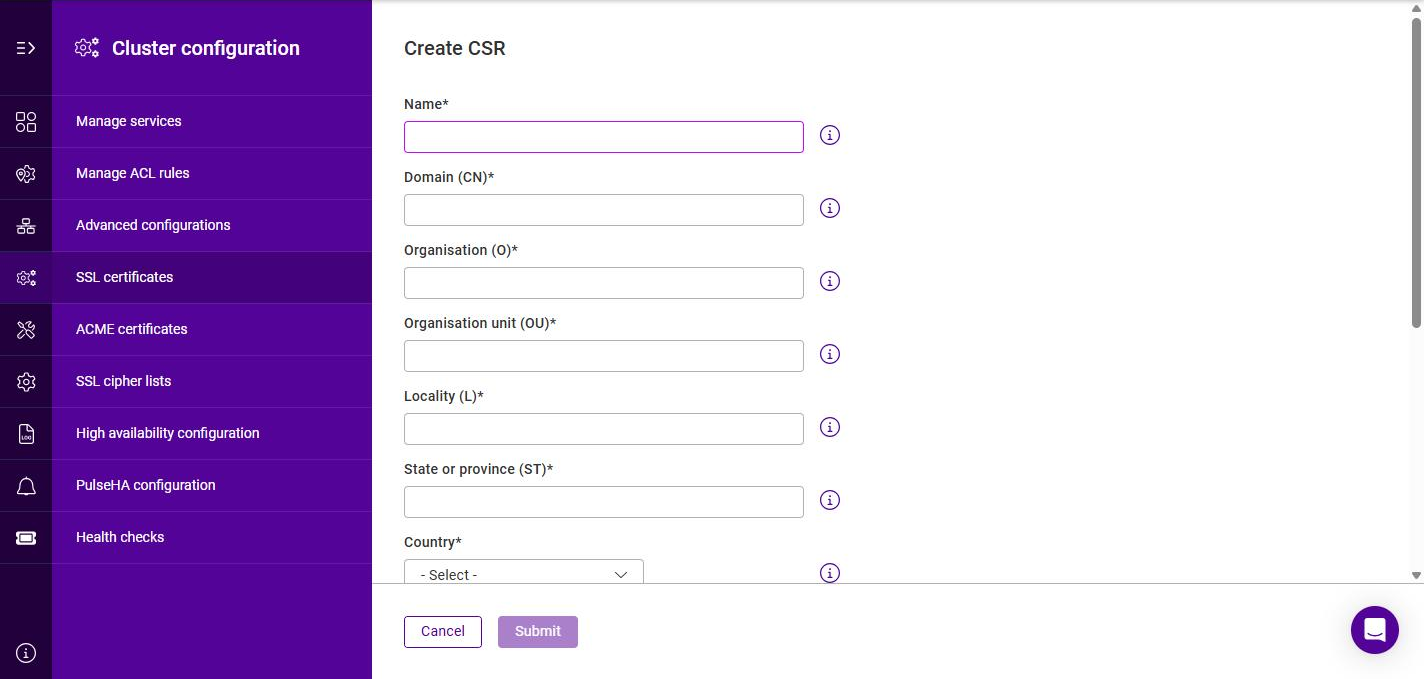
Click Create CSR.
-
Specify an appropriate Name for the CSR.
-
Complete the remaining fields according to your requirements:
-
Domain (CN) - the fully qualified domain name to be secured.
-
Organisation (O), Organisation unit (OU), Locality (L), State or province (ST) and Country - the organisation and location details to be embedded in the certificate.
-
Subject alt (SAN) - to include Subject Alternative Names, enter each value and click Add. Each entry must start with one of the following:
DNS:,IP:oremail:, e.g. DNS:www.example.com. -
Email - a contact email address.
-
Self signed - enable this option to create a test or temporary self-signed certificate rather than a CSR to send to a CA.
-
CSR key length - the key length in bits (2048, 3072, 4096 or 8192).
-
Signature algorithm - the signature algorithm used to sign the request, e.g. SHA256.
-
-
Once all fields are complete, click Submit.
CA Certificates
Certificate Authority (CA) certificates - the signing/root certificates used to verify client or server certificates - can be added to the load balancer either by uploading the file, or by copying & pasting the certificate text.
To add a new CA certificate:
-
Using the WebUI, navigate to Cluster Configuration > SSL Certificates.
-
Select the CA tab.
-
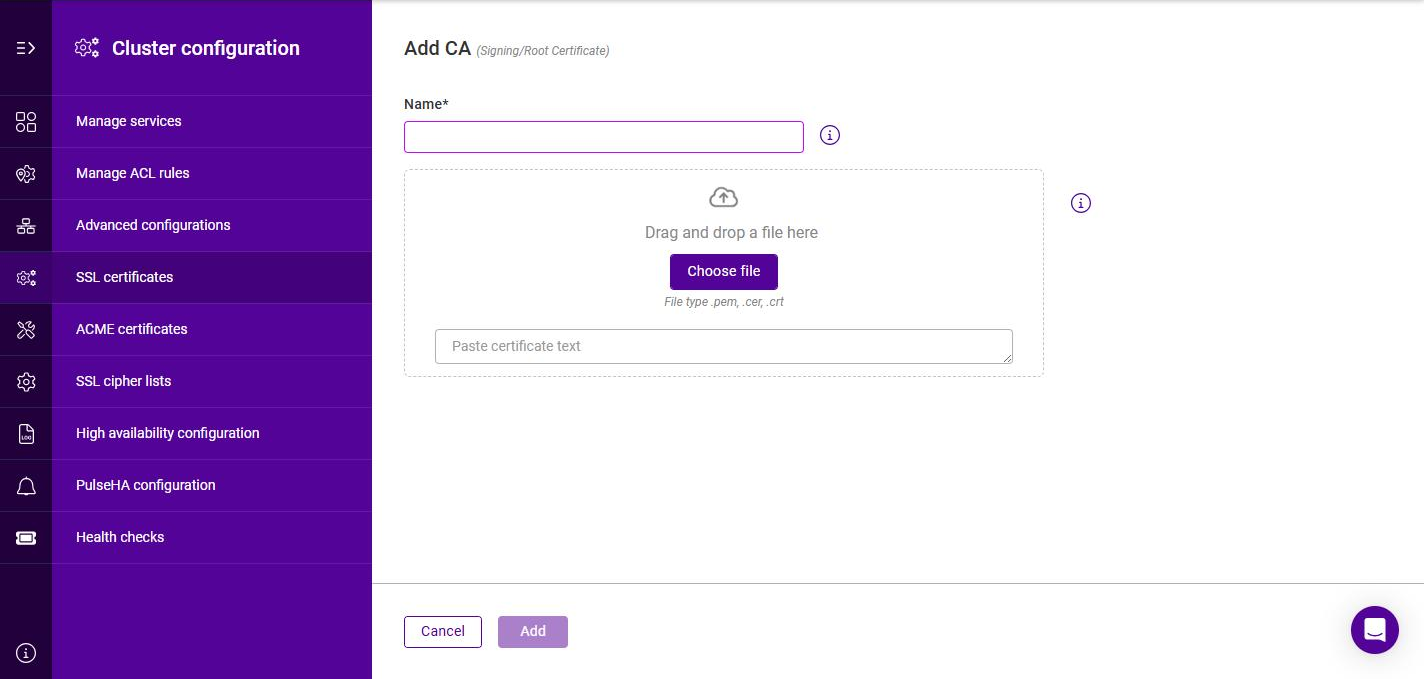
Click Add CA.
-
Specify an appropriate Name for the CA certificate.
-
Provide the certificate content using one of the following methods:
-
Upload a file - drag & drop the file onto the upload area, or click Choose file and browse to and select the relevant file. Supported file types are .pem, .cer and .crt.
-
Paste - paste the PEM-encoded CA certificate into the Paste certificate text box. Multiple
CERTIFICATEblocks are accepted for certificate chains.Include all text from
-----BEGIN CERTIFICATE-----through to-----END CERTIFICATE-----as shown in the example below:-----BEGIN CERTIFICATE----- MIIDQDCCAigCAQEwDQYJKoZIhvcNAQELBQAwYzELMAkGA1UEBhMCQVUxEzARBgNV BAgMClNvbWUtU3RhdGUxDzANBgNVBAcMBlBvbXBleTEPMA0GA1UECgwGbGIub3Jn MQwwCgYDVQQLDANkZXYxDzANBgNVBAMMBmxiLm9yZzAgFw0yMzAyMjIwOTA0Mjla GA8zMDIyMDYyNTA5MDQyOVowZzELMAkGA1UEBhMCQVUxEzARBgNVBAgMClNvbWUt -----END CERTIFICATE-----
-
-
Click Add.
Certificate Revocation List (CRL)
A Certificate Revocation List (CRL) can be added to the load balancer either by uploading the file, or by copying & pasting the list text.
To add a new CRL:
-
Using the WebUI, navigate to Cluster Configuration > SSL Certificates.
-
Select the CRL tab.
-
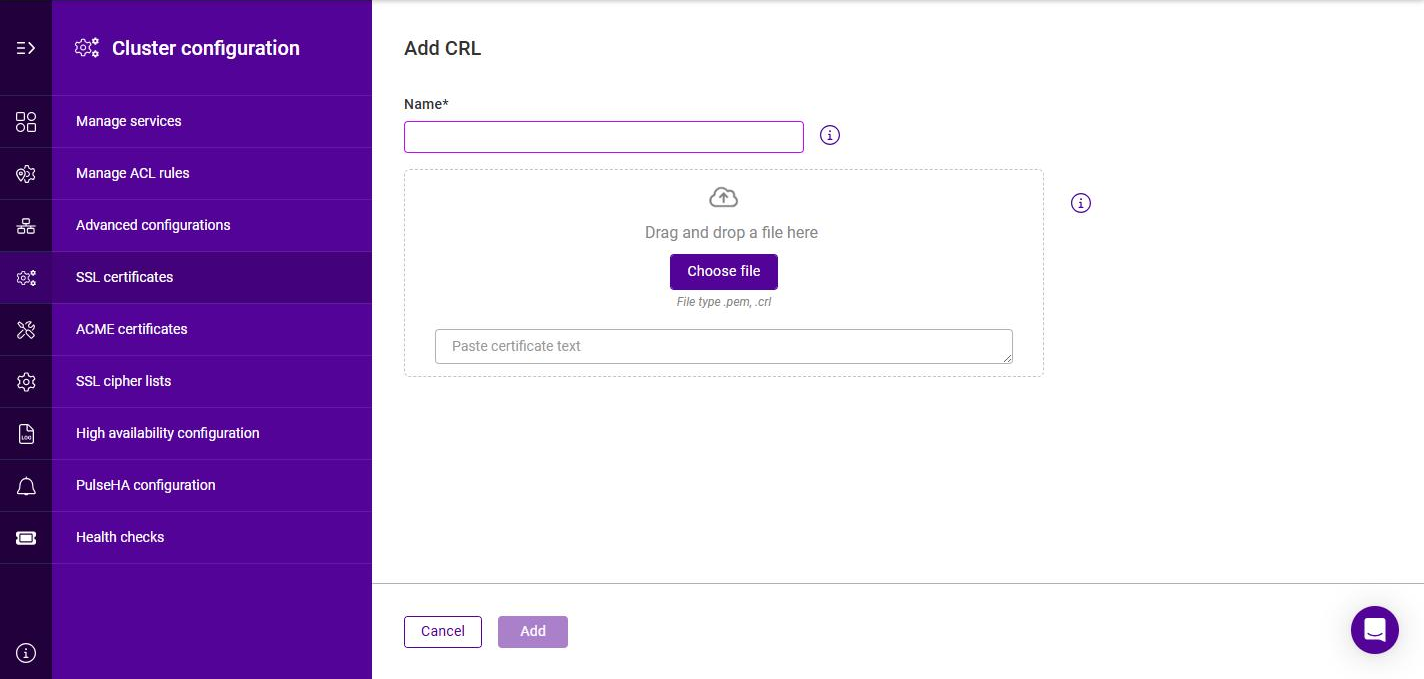
Click Add CRL.
-
Specify an appropriate Name for the CRL.
-
Provide the PEM-encoded X.509 Certificate Revocation List using one of the following methods:
-
Upload a file - drag & drop the file onto the upload area, or click Choose file and browse to and select the relevant file. Supported file types are .pem and .crl.
-
Paste - paste the CRL content into the Paste certificate text box.
-
-
Click Add.
ACME certificates
The appliance can automatically obtain and renew SSL/TLS certificates from a supported Certificate Authority (CA) using the ACME (Automatic Certificate Management Environment) protocol - the protocol popularised by Let’s Encrypt. Rather than manually generating a CSR, submitting it to a CA and installing the signed certificate, the appliance proves that it controls the relevant domain(s), retrieves the issued certificate and renews it automatically before it expires.
Certificates issued this way are added to the central certificate store alongside manually added certificates (see SSL Certificates) and can be associated with Layer 7 services to provide SSL/TLS termination, as described in SSL/TLS Termination - Concepts.
ACME configuration is managed under Cluster Configuration > ACME certificates.
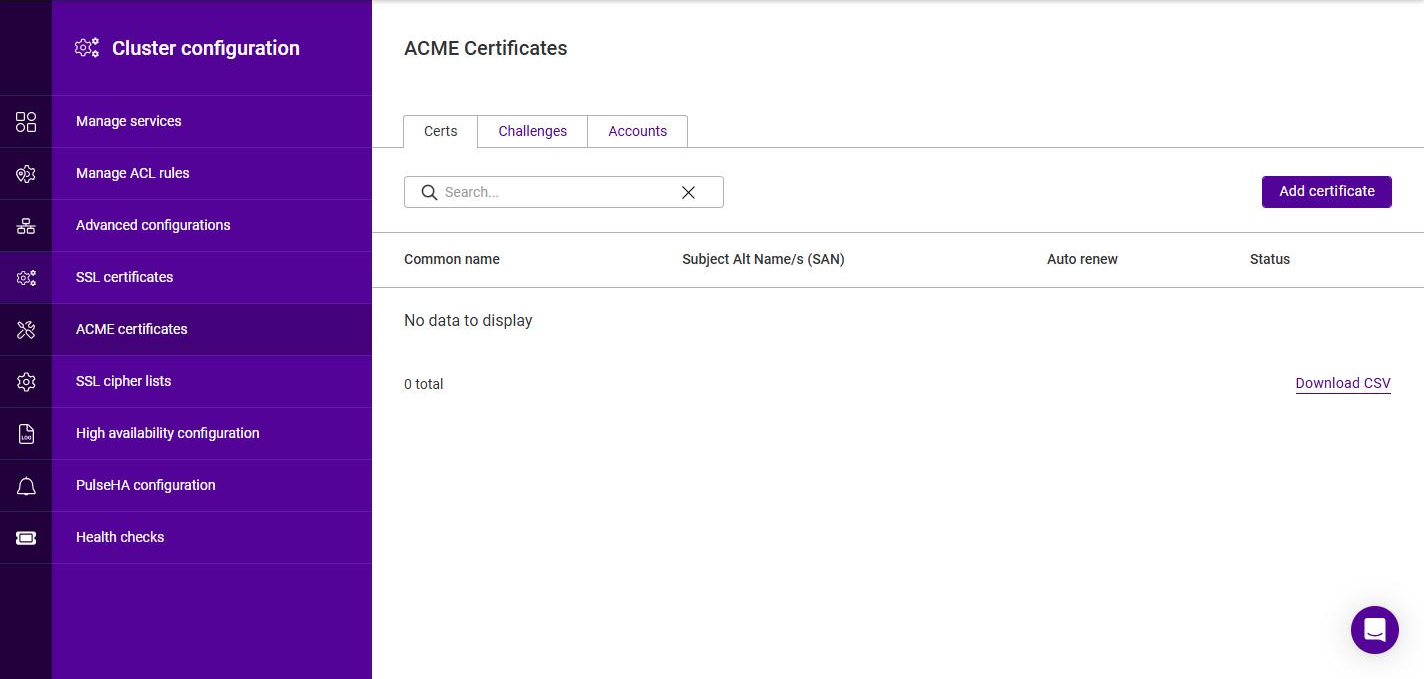
The page is divided into three tabs:
-
Certs - the ACME certificates that the appliance requests, issues and renews.
-
Challenges - the domain validation challenges used to prove control of a domain.
-
Accounts - the accounts registered with each ACME provider (CA).
An account and a challenge are prerequisites for requesting a certificate, so configuration is performed in the following order:
-
Register an account with your chosen ACME provider.
-
Define a challenge that determines how domain ownership is validated.
-
Request a certificate that uses the account and challenge.
Adding an Account
An ACME account associates the appliance with a Certificate Authority. At least one account must be configured before a certificate can be requested.
To add an account:
-
Using the WebUI, navigate to Cluster Configuration > ACME certificates.
-
Select the Accounts tab.
-
Click Add account.
-
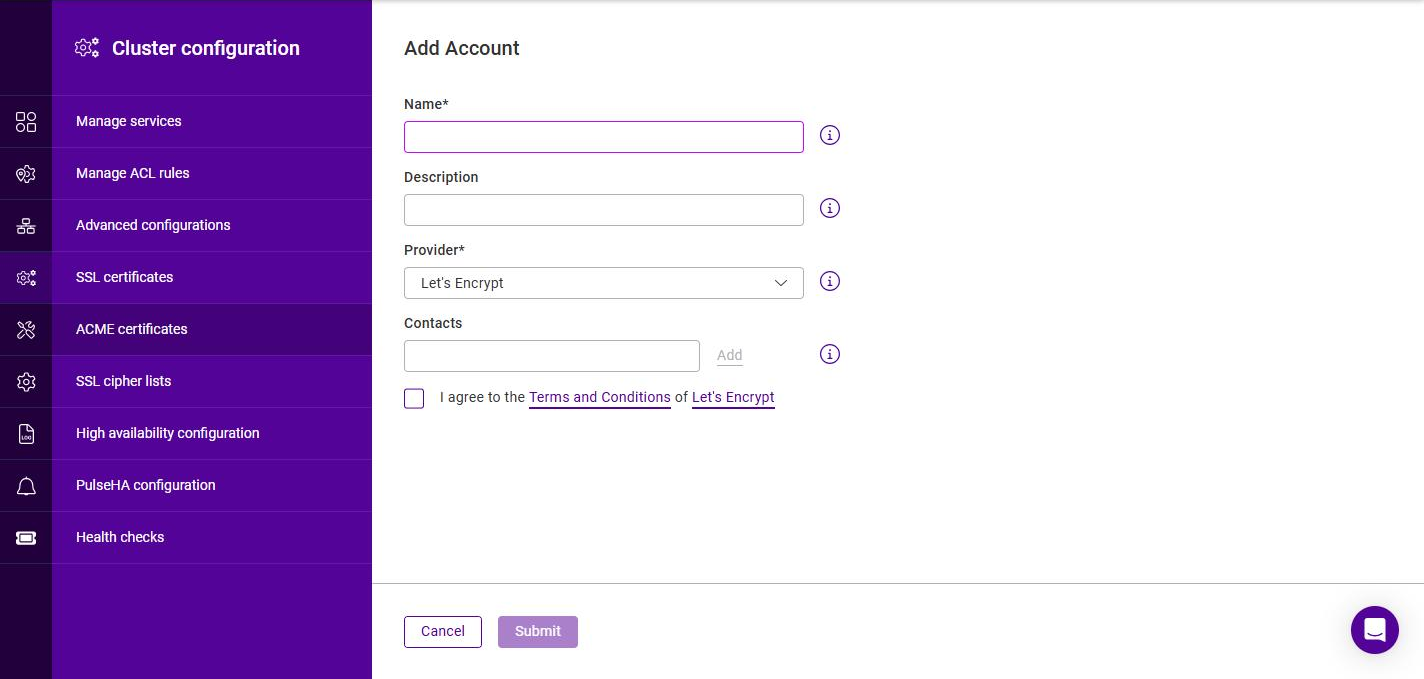
Specify an appropriate Name for the account.
-
Optionally, enter a Description for the account.
-
Select the Provider (Certificate Authority) to register the account with. The following providers are supported:
-
Let’s Encrypt and Let’s Encrypt (Staging)
-
ZeroSSL
-
BuyPass and BuyPass (Test)
-
Sectigo DV, Sectigo OV and Sectigo EV
-
InCommon OV RSA and InCommon OV ECC
-
SSL.com DV RSA and SSL.com DV ECC
-
Google Trust Services and Google Trust Services (Test)
The Staging and Test providers issue certificates that are not publicly trusted. They are intended for validating your configuration without consuming the production rate limits of the CA.
-
-
In the Contacts field, enter a contact email address and click Add. Repeat to add further addresses. These are the addresses that the CA uses for expiry and other account notifications.
-
Enable I agree to the Terms and Conditions to accept the terms of the selected provider. Links to the provider’s terms are displayed alongside the option.
-
Click Submit.
Adding a Challenge
A challenge defines how the appliance proves to the CA that it controls the domain(s) named in a certificate. At least one challenge must be defined before a certificate can be requested.
To add a challenge:
-
Using the WebUI, navigate to Cluster Configuration > ACME certificates.
-
Select the Challenges tab.
-
Click Add challenge.
-
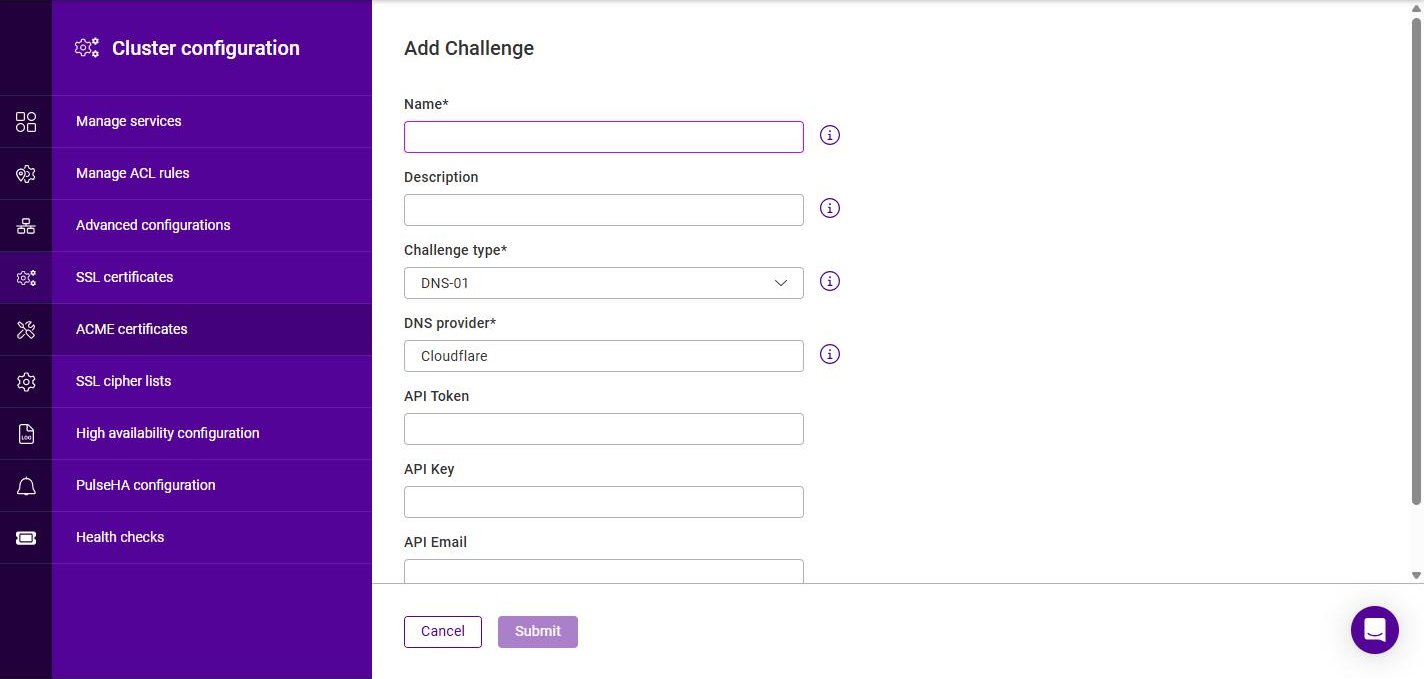
Specify an appropriate Name for the challenge.
-
Optionally, enter a Description for the challenge.
-
Select the Challenge type:
-
HTTP-01 - the CA validates domain control over HTTP. The appliance answers a validation request on port 80 for the domain being secured. This requires the domain to resolve to the appliance and port 80 to be reachable.
-
DNS-01 - the CA validates domain control via a DNS TXT record. This method is required for wildcard certificates and is useful where port 80 cannot be exposed. When selected, a DNS provider must also be specified so that the appliance can create the required record automatically.
-
-
If DNS-01 is selected, choose the DNS provider that hosts DNS for the domain. A wide range of providers is supported, including Cloudflare, Amazon Route 53, Azure DNS, DigitalOcean, GoDaddy, Hetzner, IONOS, Linode, OVH and many others.
-
Complete the credential fields shown for the selected DNS provider. These vary by provider - for example, Cloudflare requires an API Token, or an API Key and API Email - and are used by the appliance to authenticate to the provider’s API when creating the validation record.
-
Click Submit.
Adding an ACME Certificate
Once an account and a challenge have been configured, a certificate can be requested. The appliance obtains the certificate from the CA and, where enabled, renews it automatically.
To add an ACME certificate:
-
Using the WebUI, navigate to Cluster Configuration > ACME certificates.
-
Select the Certs tab.
-
Click Add certificate.
-
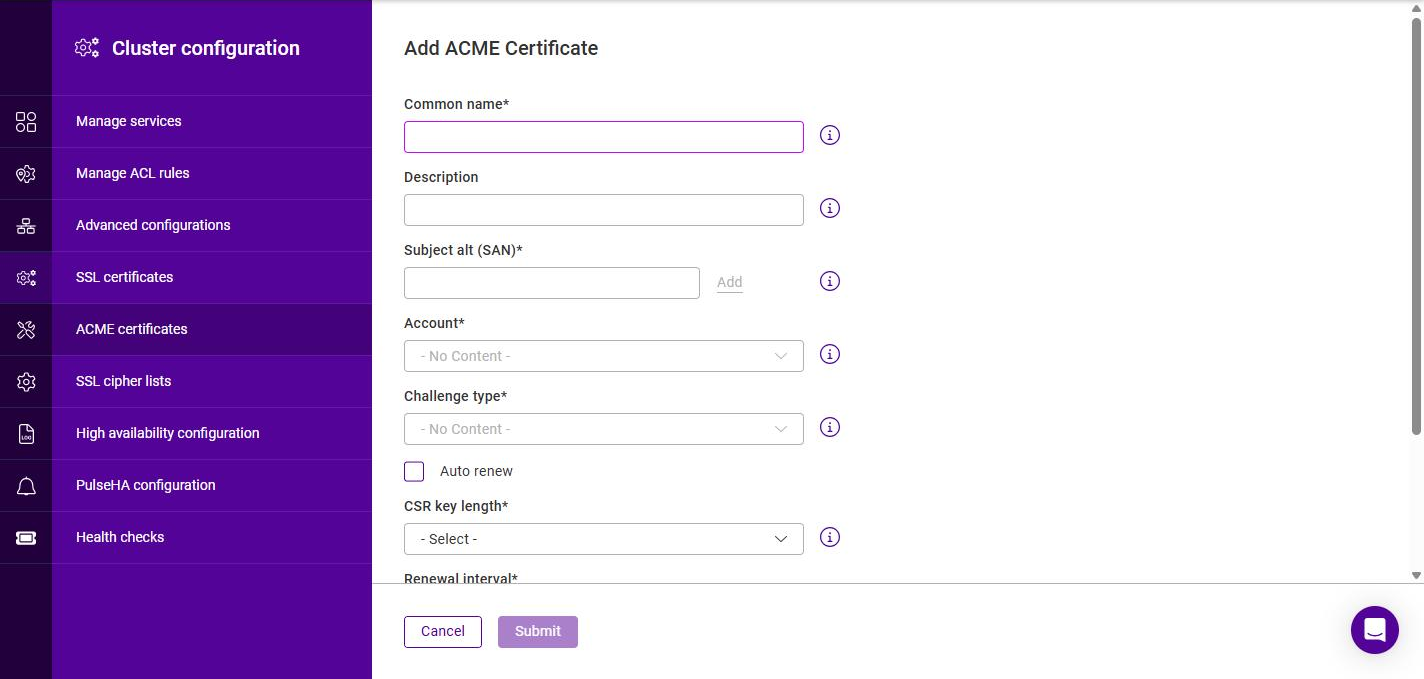
Specify the Common name - the primary fully qualified domain name (FQDN) to be secured, e.g. www.example.com.
-
Optionally, enter a Description for the certificate.
-
In the Subject alt (SAN) field, enter each additional domain name to be included on the certificate and click Add. Repeat as required.
-
Select the Account to use for the request - one of the accounts configured on the Accounts tab.
-
Select the Challenge type - the challenge, configured on the Challenges tab, used to validate the domain(s).
-
Enable Auto renew to have the appliance automatically renew the certificate before it expires.
-
Select the CSR key length in bits (2048, 3072, 4096 or 8192).
-
Specify the Renewal interval - the interval, in days, at which the certificate is renewed.
-
Leave Certificate set to None to request a new certificate, or select an existing certificate to convert it to an ACME-managed certificate.
-
Click Submit.
Once created, the certificate is issued by the CA and listed on the Certs tab, along with its Subject Alt Name/s (SAN), Auto renew setting and current Status. It is also added to the SSL certificate store, ready to be selected when configuring SSL/TLS termination for a Layer 7 service (see SSL/TLS Termination - Concepts).
SSL cipher lists
A cipher list (or cipher suite list) defines the set of encryption algorithms that the appliance will offer when terminating SSL/TLS connections for a Layer 7 service. When a cipher list is associated with a service (see SSL/TLS Termination - Concepts), it controls the ciphers that the service presents to connecting clients during the TLS handshake.
The appliance provides a number of built-in cipher lists and also allows custom lists to be created to meet specific security or compatibility requirements.
Cipher lists are managed under Cluster Configuration > SSL cipher lists.
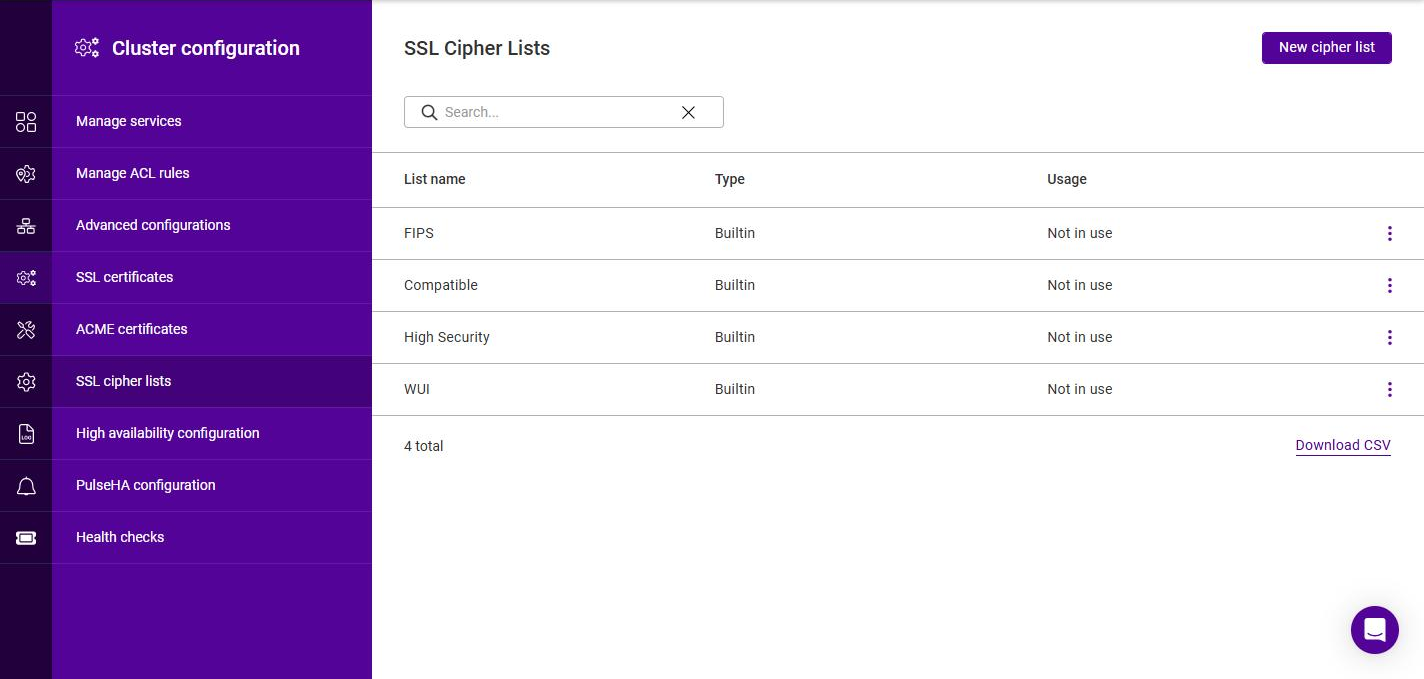
Each list is shown with the following information:
| Column | Description |
|---|---|
List name |
The name of the cipher list. |
Type |
Builtin for a predefined list supplied with the appliance, or Custom for a user-created list. |
Usage |
Indicates whether the list is currently associated with one or more services, or Not in use. |
The built-in cipher lists are:
| Cipher list | Description |
|---|---|
FIPS |
A FIPS 140-2 compliant cipher list. |
Compatible |
A broad cipher list that maximizes compatibility with older clients. |
High Security |
A restricted cipher list offering the strongest security, at the expense of compatibility with older clients. |
WUI |
The cipher list used by the appliance WebUI. |
| Built-in cipher lists cannot be modified or deleted. To base a new list on a built-in list, duplicate it as described below. |
| Click Download CSV to export the displayed cipher lists to a CSV file. |
Creating new Cipher Lists
New cipher lists can be created if required. These can be created from scratch or by duplicating and editing an existing list.
From Scratch
-
Using the WebUI, navigate to Cluster Configuration > SSL cipher lists.
-
Click New cipher list.
-
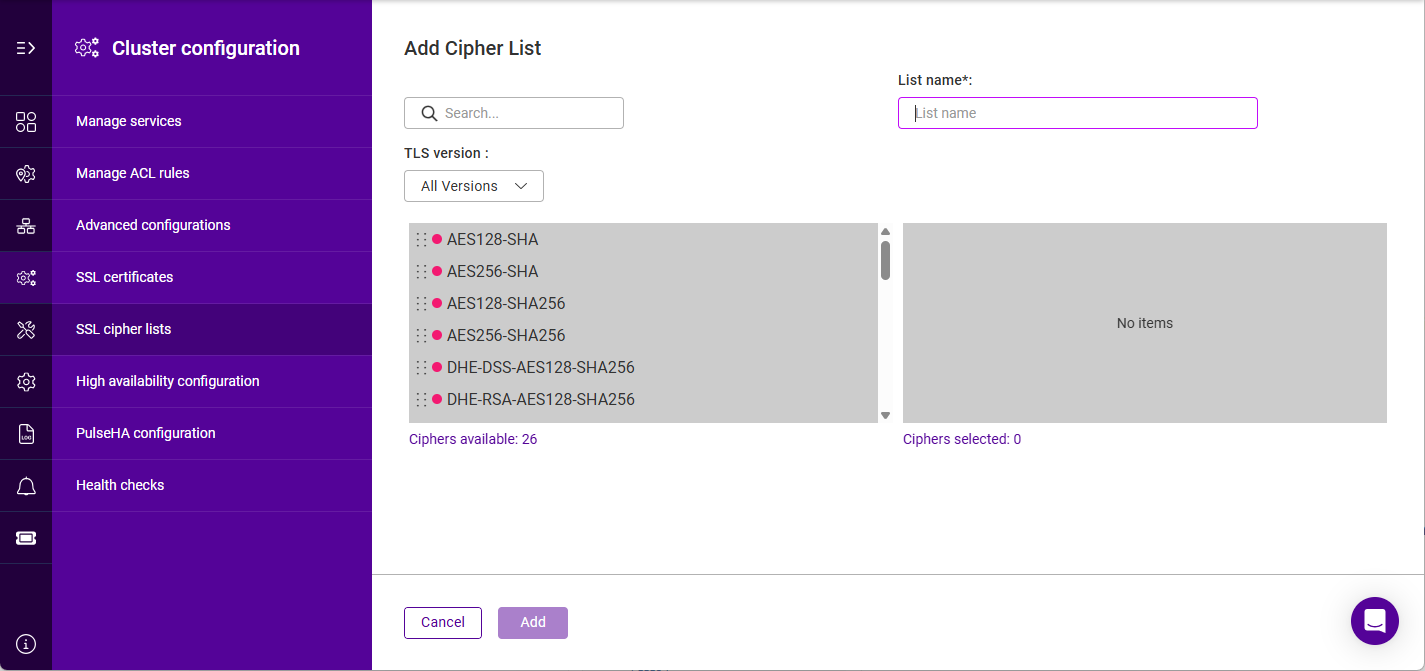
Specify an appropriate List name for the new list.
-
Drag and drop the required cipher suites from the available (left) panel to the selected (right) panel. Ciphers can be dragged back to the left panel to remove them.
Use the Search box to filter the available ciphers by name, and the TLS version drop-down (All Versions, TLSv1.0, TLSv1.1, TLSv1.2 or TLSv1.3) to show only the ciphers applicable to a particular protocol version. -
Once all required cipher suites have been selected, click Add to create and save the list.
Duplicating an Existing List
-
Using the WebUI, navigate to Cluster Configuration > SSL cipher lists.
-
Click the three dots menu next to the list you’d like to duplicate and click Duplicate.
-
The List name is pre-populated as <original list> (duplicate) - change this to a suitable name for the new list.
-
Customise the cipher suites by dragging ciphers into or out of the right panel.
-
Once all required cipher suites have been selected, click Update to create and save the list.
Viewing & Modifying Cipher Lists
-
Using the WebUI, navigate to Cluster Configuration > SSL cipher lists.
-
Click the three dots menu next to the relevant list:
-
For a Builtin list, click View to display the cipher suites it contains in a read-only window.
-
For a Custom list, click Edit to view and amend its cipher suites, or Delete to remove it.
-